Sunday, July 6, 2008

Free Tablecloth Pattern!


This pattern goes together very quickly, and gives you lots of open space in the center for adding embroidery and appliqué! There are only 14 blocks to piece, and two outer borders, so it will be on your table quickly.

To download a PDF for this tablecloth, click on the button at the left to join the Candy Apple Quilts Yahoo Group --- the file is there waiting for you!

A Mother's Love

This quilt was one of my favorites to work with! Brought to me by a wonderful woman who embroidered every block, she told me the story of how she was making it for her daughter. It has more work, joy, and talent, and love than any other quilt I have had the honor of doing. Here is a picture of the entire quilt:
Each block demanded different treatment, so we put our heads together, and came up with designs that incorporated hearts --- to play on the theme of love and family. My favorite:
We added lots of hearts throughout the quilt, in many surprising places!

Receiving a hug from Leslie when this quilt was done was one of my happiest moments!

Tuesday, April 29, 2008

Same pattern -- different look!


Time to reuse some of the patterns I have, and try and make them look completely different! This quilt has a formal name (which I can't remember....) but I call it the Orient Express. It has lots of Asian influence, and beautiful butterflies all over.

Any time I see butterflies, I think of my friend Lyn. That happened with this quilt, and then it dawned on me.... the Stained Glass quilt that we just finished for her had a beautiful butterfly pattern on it! That would be a great one to use again! I'm not sure if you can see the design in the close-up above, but it's exactly the same as the design used on Lyn's Stained Glass quilt below. Same pattern, but a totally different look!

Thursday, April 10, 2008

Wednesday, April 9, 2008

Quilts as Suncatchers

Have you ever felt that you would run out of space for yet another quilt? The beds are covered, the walls are covered, the table tops are covered --- even the dog is wearing quilted jackets! A nice idea for a a small quilt is hanging it on a patio door or window. Let the sun shine through it and highlight your beautiful stitches! Here is a new wall-hanging made by Lyn Christian of A Design by Lyn that will hang in a sunny spot soon!

Lyn's quilt has butterflies in the center panel that can be highlighted with crystals, and the borders could be done, too. Here's a close-up of one of the butterflies.


There's always a good reason to finish up those small quilts! And now you have a new place to hang them!

Thursday, April 3, 2008

Stitching right over the embroidery!


Lots of people agree that sometimes it's just easier to keep stitching --- right over top of the embroidery! In the case of redwork designs, I think that's very true!

This quilt was done on a Gammill machine with a Statler Stitcher (computerized), and it would have been impossible to stop the machine for each tiny line that I crossed. The stitching is imperceptible on the redwork, and not a distraction at all.

The embroidery designs used in this quilt are from Bonnie Domeny at Threadlove Embroidery, and you can find the collection of all ten ballerinas here.

Wednesday, April 2, 2008

Embroidery on Quilts


Our school district was having a fund raiser for the Marching Band, and they wanted a quilt that they could raffle off. Being in Ohio, I thought that the best block pattern that I could use was the Ohio Star. I chose blue and gold for the school colors, and embroidery designs with a music theme to them. I always prefer to do the embroidery on the fabric before the blocks are assembled, because I don't want the bobbin stitches to show on the back of the quilt.

As a special tough, I digitized the school logo, and embroidered it for the block that would end up in the center of the quilt. You can see a close-up of the embroidered logo in the block.

My favorite stabilizer to use for this type of embroidery is a tear-away/wash-away. You can remove the bulk of it by tearing it away after you embroider, and then proceed to assemble the quilt. When the quilt is finished, the block is nice and soft. The stabilizer that does remain behind the stitches holds up well over time, and any extra stabilizer just washes away when the quilt is laundered.


Monday, March 31, 2008

Cross-Hatching Across Satin Stitches


This one was a bit of a challenge --- but then again, I just LOVE a challenge! I received an embroidered quilt top that just "demanded" to be cross-hatched in the center. I didn't want to stitch across any of the letters, because that would squash the satin stitches. I also didn't want to do tie-offs at every letter, though.... so I came up with this little technique for "cheating".

Do the cross-hatching as you normally would. Take a close look at the small photo that shows a close-up of the letter with the crystal in it. If you look at the blue satin stitch portion of the letter itself, you can see where I "jumped" over the blue portion of the letter during the cross-hatching process. The width of the jump stitch is less than 1/4 of an inch, but if I had stitched right through the letter, it would have crushed the satin stitches.

This was done with white thread, so as a result there were little tiny white jump stitches showing on most of the letters. I went to the fabric store, and bought a fine tip permanent fabric marker -- the kind with the tiny micron tip -- in exactly the same shade of blue as the letters. That's the most critical part -- matching the thread color.

Now, all you have to do is "color" the white thread that is laying on top of the satin stitches. The single thread will fade into the background of the satin stitches, and look just like another single stitch. On the back of the quilt, you will not want to cut those tiny stitches, or there will be some unraveling of your cross-hatching in the future.

For the jumps over the pink floral portion of the quilt, I did tie-offs, and started again on the other side.

And by the way, this alphabet is available in a beautiful heirloom collection from Platinum Embroidery! You will also be able to read a newsletter that has all of the instructions for making this wall-hanging project! Here's a link to the page that shows the entire collection:

Platinum Embroidery Make It Special Heirloom Collection

These letters stitch out beautifully! Enjoy!

Sunday, March 30, 2008

Machine Applique part two


Here is another example of using embroidery and appliqué before the quilt is assembled. In this tablecloth, I appliquéd all of the small white squares first on the white tone-on-tone fabric, and then cut them to size and assembled each quilt square. The assembly of the quilt was much faster, because I was able to treat each appliquéd square just like a regular piece of the block. I know that I would have had a hard time trying to appliqué all of the squares if the quilt had already been assembled. I know lots of people who can do it that way, but I'm just not that brave! LOL!

Machine Applique


Machine embroidery is shown on this quilt in two different ways. I digitized the appliqué designs, and used a blanket stitch for the edges. I wanted the soft look that blanket stitches can give over time, with just a touch of fraying through the stitches. This quilt was for my daughter's sixteenth birthday -- I can't believe it's been 4 years ago already!

You can use any of your existing appliqué designs if you have the digitizing software to enable you to change the satin stitches along the outer edge to a blanket stitch. As I mentioned, the edges will fray just a tiny bit over time, but that adds a soft look to the quilt.

For the lettering, I embroidered on the white fabric before I assembled the quilt. All of the bobbin thread from the embroidery and the appliqué is hidden inside of the quilt layers.

This little lap quilt has seen a lot of hugging over the past four years, but it just gets better with age.

Paper Piecing

Lots of discussion has centered around the topic of adding embroidery to quilts --- and the main question is always "Do I make the entire quilt first and then add the embroidery, or do I embroider the pieces and then make the entire quilt?"

I prefer to embroider the individual pieces first, and then create the entire quilt. The embroidery process shrinks the pieces by pulling in on them. Your pieces should be embroidered first, and then cut to the proper size to accurately fit your quilt blocks.

In this example, the names of various boats and their owners were embroidered first on the red fabric. After pressing the pieces with a tiny bit of starch, I used them for the paper-piecing process on this quilt. This allowed me to use a tear-away/wash-away stabilizer that will add body to the lettering, but the bulk of the stabilizer (the part that was not under the lettering) will wash out of the quilt over time. Also, there will not be any bobbin thread from the embroidery showing on the back of the quilt.

Saturday, March 29, 2008

Adding hand stitches to machine quilting


I just love where machine quilting is headed these days -- the effects that are achieved are truly amazing. Sometimes, though..... I just want to sit down and stitch by hand. Oh, sure -- I'm still doing the binding by hand, but that's not quite the same as doing quilting stitches. I guess you could say I've missed it a bit, since I was a hand-quilter for so long.

If you do any machine quilting (long arm or short arm), and you want to add something really special and fun to your quilts, try adding just a touch of hand stitching!

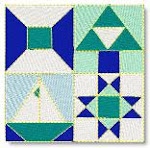
Here is a little whole cloth quilt that I did a few months ago.

I thought it would look nice with a little touch of color in the center. Here is a close-up of the machine embroidery that was added.

You can see that there are also hand quilted stitches a quarter of an inch away from the machine stitches. I like the effect of the two types of stitches combined! Each of the corners had a little heart inside of a square, and I think it really softens things up a bit when there are a few extra stitches added.


Wednesday, March 26, 2008

Candy Apple Quilts


I'd like to share a few pictures with you of a quilt that I have just finished called Scrappy Mountain Majesties. This was done with a pattern that I saw at Quiltville, and it was tons of fun! I used up lots of different shades of green from my stash. You could use any combination of colors to create a truly scrappy quilt in all different colors. It's also a fun project to do with friends, because you can take full advantage of the "assembly line" style of sewing.


Here's a close-up of the quilting used on this project. The patterns I used are called Gilded Deluxe Friends, and they are available through Anne Bright.


Anne's patterns always have coordinating borders, squares, triangles, etc.... and just really brighten up any quilt that I have used them for. These designs are for use with a Statler Stitcher -- the computer-aided long arm quilting machine made by Gammill.